If you’re a newcomer to the Shopify platform and have been perusing our content, you may be intrigued by the frequent references to Liquid. In this article, we aim to provide a comprehensive explanation of Liquid, its significance in Shopify theme development, and the fundamental concepts that will empower you to craft captivating e-commerce templates.
What is Liquid?
Liquid, an open-source template language, serves as the foundation for all Shopify themes. Despite the diverse appearances of Shopify’s themes, they all stem from this core codebase.
While Liquid intentionally offers fewer capabilities than other programming languages, it acts as a seamless connection between stored data and HTML. Consequently, it is often referred to as a template engine or syntax rather than a language. Nevertheless, like any other coding language, it employs if/then statements, logic, and loops.
Originally developed by Shopify’s co-founder and CEO Tobias Lütke using Ruby, Liquid has gained popularity and is now utilized by other prominent platforms, including Salesforce and Zendesk.
Liquid’s role in the Shopify theme editor: Static vs. dynamic content
When viewing a website, it is difficult to discern between static and dynamic content.
In a nutshell, static content is directly embedded into the page, while dynamic content is fetched from a database and then displayed on the page.
Web developers utilize template languages to seamlessly integrate static and dynamic content on a webpage, ensuring a seamless user experience where the distinction is imperceptible.
Static content remains consistent across pages, while dynamic content changes. In your Shopify store, static elements are composed in HTML, while dynamic elements are crafted using Liquid. This demarcation allows for a seamless blend of stability and adaptability in your web design.
The Liquid code serves as a fundamental placeholder.
The purpose of this functionality is to fetch particular referenced information from your Shopify store, such as the store name, product details, and images. This data is retrieved when the code is compiled and sent to the browser. Subsequently, the browser retrieves assets like your Javascript and CSS files to showcase your personalized theme.
Shopify themes are designed to be agnostic, allowing the same code to seamlessly function across multiple stores without requiring any modifications. This flexibility eliminates the need for adjustments, ensuring a streamlined and efficient experience for all users.
Changing your Shopify theme becomes a seamless and effortless process with this method.
Understanding the Fundamentals of Liquid Syntax
You don’t need to know much about store databases to use this template language.
Liquid has its syntax to display the right information.
The code uses three major pieces: objects, tags, and filters.
Objects – those are pieces of your Shopify data, such as product name, availability, collections, blog posts,
discount codes etc. that you want Shopify to show on your website;
Tags – they don’t produce visible output as objects do, but you can assign variables and create conditions or loops to
display the message on the page when a product is sold out or when a collection is empty, and much more;
Filters – they modify the output of numbers, strings, objects, and variables; you can have general filters
(date, address format, etc.), media, font, URL, money, math or array filters, and more; all of them are used to modify
Information.
Where can you see and start editing Shopify’s Liquid?
Gaining access to Shopify Liquid: A step-by-step process
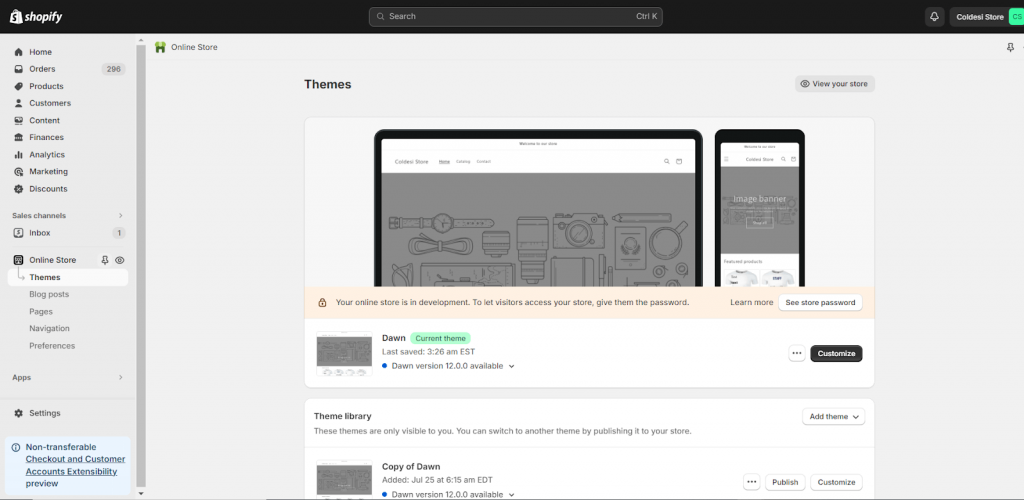
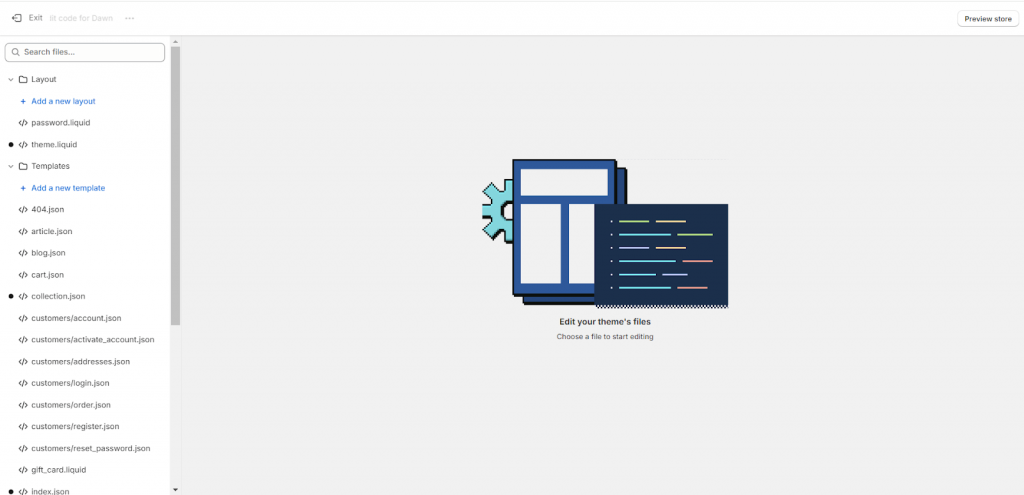
Every Shopify user can edit the code. To access it, log in to the Shopify admin panel and go to Online Store > Themes in
the menu on the left. Click the Actions button and choose Edit code from the drop-down list.

You should see this bit (screenshot below) with liquid files that have an extension of .liquid. Every liquid file contains
standard HTML code and Liquid. You can tell them apart quite easily. Liquid uses its delimiters. It’s either the double
curly brackets {{ }} or the curly brackets and percentage combination {% %} that surround a text.

The double curly brackets that envelop text, such as {{product.name}} tell Shopify which output should be shown.
What is output? It’s rather self-explanatory. It’s the very element that you want to retrieve from the database at
this moment, like the name of a product or its price.
The curly bracket and percentage sign that wraps around the text stand for tags. And as we’ve learned before, tags don’t
denote visible output. They denote logic. So, a curly bracket and percentage sign combination tells Shopify what we
want it to do, be it creating conditions, loops, or assigning variables. Except for text, there are operators inside the
brackets that tell Shopify what you want it to do.
Summing up:
.liquid – file name
{{ }} – Liquid delimiter that denotes output, such as objects and filters
{% %} – Liquid delimiter that denotes logic, that is variables, conditions, and loops (tags)
Shopify Liquid Objects: A closer look
Objects are the foundation of Liquid.
After all, they are the feature that determines what visitors to your store can see.
Content objects
Content objects output template and section file content for your Shopify store, plus any stylesheets or scripts created by Shopify or apps.
- {{ content_for_header }} – This object must be included in theme.liquid, which functions as the master template file in Shopify (all themes are rendered in theme.liquid). It’s located inside the HTML tag and loads all the scripts required for Shopify apps, including Shopify Analytics and Google Analytics.
- {{ content_for_layout }} – This is another object that must be included in theme.liquid. It retrieves content from other templates.
- {{ content_for_index }} – This object must be included in templates/index.liquid. It retrieves the sections that are to be rendered on your homepage.
Global objects
Global objects (AKA global variables) are accessible from any Liquid file in your theme.
They are used to pull the following pieces of data from your store:
- {{ all_products }} – A list of all the products in your store (up to 20).
- {{ articles }} – A list of all the articles on your site.
- {{ blogs }} – A list of all the blogs on your site.
- {{ canonical_url }} – The URL of the current page with all parameters removed.
- {{ cart }} – Your store’s cart.
- {{ collections }} – A list of all the collections in your store.
- {{ current_page }} – The number of the current page (used for paginated content).
- {{ current_tags }} – A list of tags (the specific tags retrieved depends on the template you’re using).
- {{ customer }} – The customer that is logged in (if the customer is not logged in, nothing is retrieved).
- {{ linklists }} – The menus and links in your store.
- {{ handle }} – The title (also known as a handle) of the current page.
- {{ images }} – Access an image with its filename.
- {{ pages }} – A list of all the pages in your store.
- {{ page_description }} – The description of the current page.
- {{ page_title }} – The title of the current page.
- {{ recommendations }} – Product recommendations.
- {{ shop }} – Information about your store.
- {{ scripts }} – Information about all active scripts. To access information about a particular script, add the type of script to this object as a property in dot syntax (script.type).
- {{ settings }} – A list of the settings in your current theme.
- {{ template }} – The name of your current theme.
- {{ theme }} – Your current theme.
Remember that all of these objects have up to dozens of properties, which each have a function of their own.
Also, many objects aren’t considered content objects or global objects.
Shopify Liquid tags
Tags are a little more active than objects. They can create loops, run conditional if/then statements, and change how objects are displayed.
There are four types of tags:
- Theme tags: Output template-specific HTML markup, tell your theme which layouts and snippets (files containing chunks of reusable code) to use, and break up arrays (lists of variables) into more than one page. For example: the {% form %} tag can be used to add a form to a page.
- Variable tags: Create new variables. For example: the {% assign %} tag allows you to create and name a new variable.
- Iteration tags: Repeat blocks of code. For example: the {% for %} tag will repeatedly execute a block of code. This is useful when you want to display a collection of products on a page, as it saves you from having to add code for each item. Note that these loops are limited to 50 results, so you’ll need to use pagination if you have more than 50 products.
- Control flow tags: Determine whether blocks of code are executed or not depending on the situation. For example: the {% if %} tag will only execute a piece of code if certain conditions are met.
Shopify Liquid filters
Filters live within an object’s curly braces, augmenting its output based on many different actions.
The different types of filters include:
- Color filters: Change, lighten, darken, saturate, or desaturate the color of objects.
- Font filters: Change text style (normal or italic/oblique) or text weight (light, normal, bold, and anything in between). With the font_face filter, you can also add custom fonts to your theme.
- HTML filters: Add HTML elements to objects, such as payment buttons and timestamps.
- Math filters: Incorporate math equations into your objects. One application of this filter is showing a visitor how much they could save (list price multiplied by percentage discount) by taking advantage of a specific deal.
- Money filters: Format currency as specified in your Shopify store’s settings.
- Date filters: Determine the date format used within objects.
- Highlight filters: Highlight text that matches search terms to improve the functionality of your search feature.
- String filters: Alter a given string (a sequence of characters within quotation marks) to produce a consistent result. This could be to change cases, prepend characters, append characters, remove words, truncate strings, etc.
- Array filters: Changes an inputted data array to output in a specific way. This includes reversing, concatenating, sorting, and more.
Some Shopify Liquid resources to learn more
By now, you have learned a lot about what Liquid is and how it works from this lovely Shopify Liquid tutorial.
If you would like to learn more about this subject, we recommend the following resources:
- GitHub: This page contains more Liquid code and information.
- Shopify Liquid code examples: See how different website elements can be written in Liquid.
- Learning Liquid: This series of articles published by Shopify covers many topics related to Liquid.
By understanding the code behind your Shopify theme, you’ll be able to turn your ideas for pages into a reality.
Contact us to customize your Shopify website
Liquid is Shopify-specific. That’s why if you encounter any problems along the process, we’re here to help. From development to design, we’re a Shopify agency that helps brands scale on Shopify, and we’ll be more than happy to help you too. And if you want to know more about Shopify, follow our blog.
Source: https://ecommerce.folio3.com/blog/shopify-liquid/


