Introduction
Our journey into Magento 2 CLI will start with an exhaustive list of its native commands. This includes the essential setup commands for upgrading the application, compiling configurations, and deploying static content, as well as cache and indexing commands for optimizing the performance. We’ll dive into the module management commands, crucial for enabling or disabling modules, and explore the database and theme management commands, vital for maintaining the structural integrity and aesthetic appeal of your e-commerce site. But that’s not all. Understanding the built-in commands of Magento 2 CLI is just the beginning. We will also guide you through the exciting process of creating custom CLI commands in Magento 2. This segment is particularly beneficial for those looking to tailor their Magento 2 experience to fit specific business needs or to integrate custom functionalities. We’ll walk you through each step – from setting up the command structure in your module directory to registering your custom command in the di.xml file, and finally, testing your newly created command.
As we conclude, you’ll have a deeper understanding of why Magento 2’s robust CLI system is a significant advantage over its counterparts, making it an ideal solution for your e-commerce platform. Whether you’re a seasoned Magento developer or new to the platform, this guide aims to equip you with the knowledge and skills to leverage Magento 2 CLI to its full potential, streamlining your workflow and enhancing the performance of your Magento 2 store. Let’s embark on this journey to master the Magento 2 CLI.
See Also: How to Create a Magento 2 Module (A Developer’s Guide)
MAGENTO 2 CLI COMMANDS LIST
List Commands:
– bin/magento: Lists all available commands.
– bin/magento list: Lists all available commands.
Setup Commands:
Upgrade:
– bin/magento setup:upgrade: Upgrades the Magento application, applying database schema changes.
– bin/magento setup:di:compile: Compiles the dependency injection configuration.
Static Content Deployment:
– bin/magento setup:static-content:deploy: Deploys static view files.
– bin/magento setup:static-content:deploy -f: Forcibly deploys static view files.
Configuration:
bin/magento setup:config:set: Sets configuration values.
bin/magento setup:db-data:upgrade: Upgrades the Magento application, applying data changes.
Cache Commands:
Cache Management:
– bin/magento cache:flush: Flushes the cache storage.
– bin/magento cache:clean: Cleans the cache types.
– bin/magento cache:disable: Disables cache types.
– bin/magento cache:enable: Enables cache types.
Indexing Commands:
Index Management:
– bin/magento indexer:reindex: Reindexes all indexers.
– bin/magento indexer:info: Shows the status of indexers.
– bin/magento indexer:reset: Resets indexer status.
Module Commands:
Module Management:
– bin/magento module:enable: Enables a module.
– bin/magento module:disable: Disables a module.
– bin/magento module:status: Displays the status of modules.
– bin/magento module:uninstall: Uninstalls a module.
Database Commands:
Database Operations:
– bin/magento db:status: Checks if the database is up.
– bin/magento db:console: Opens a MySQL console.
Theme Commands:
Theme Management:
– bin/magento theme:status: Lists all installed themes.
– bin/magento theme:enable: Enables a theme.
– bin/magento theme:disable: Disables a theme.
STEPS TO CREATE CUSTOM CLI COMMANDS IN MAGENTO 2
Step 1: Create Command Structure
Create a new module or use an existing one to organize your custom command. Inside your module directory, create a folder named Console and within that, another folder named Command.
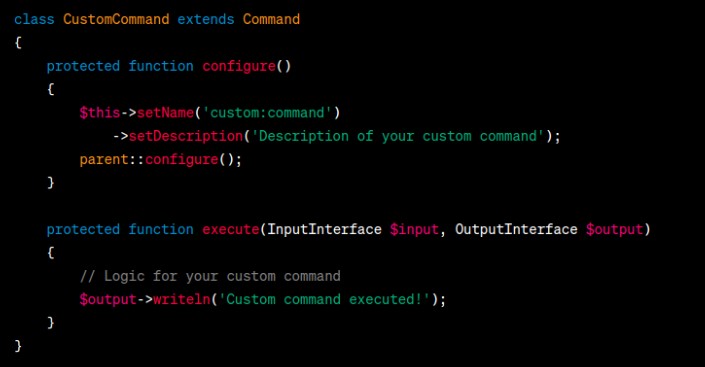
Step 2: Create Command File
Inside the Command folder, create your custom command PHP file. For example, CustomCommand.php. This file should extend the SymfonyComponentConsoleCommandCommand class.

Step 3: Register Command
Register your command in your module’s di.xml file.
<!-- app/code/Vendor/Module/etc/di.xml -->

<config xmlns:xsi="http://www.w3.org/2001/XMLSchema-instance" xsi:noNamespaceSchemaLocation="urn:magento:framework:ObjectManager/etc/config.xsd">

    <type name="MagentoFrameworkConsoleCommandList">

        <arguments>

            <argument name="commands" xsi:type="array">

                <item name="custom_command" xsi:type="object">VendorModuleConsoleCommandCustomCommand</item>

            </argument>

        </arguments>

    </type>

</config>
Step 4: Test Your Command
bin/magento custom:command
Conclusion
In wrapping up our exploration of the Magento 2 Command Line Interface (CLI), it’s clear that the CLI is an indispensable tool for managing and customizing a Magento 2 e-commerce store. The comprehensive list of commands we’ve discussed, ranging from basic setup and configuration to more advanced module and theme management, highlights the versatility and power of Magento 2 CLI. These commands not only simplify routine tasks but also empower users to efficiently maintain and optimize their Magento 2 installations. The ability to create custom CLI commands in Magento 2 further elevates its utility. By following the outlined steps to develop and integrate custom commands, users can significantly streamline their workflows and introduce functionalities tailored to their specific business needs. This customization aspect underscores Magento 2’s flexibility, making it a robust choice for e-commerce platforms that require a high degree of personalization and scalability.
See Also: Magento 2 Data Migration Tool – A Comprehensive Guide
As we conclude, it’s evident that Magento 2 CLI is more than just a feature; it’s a critical component that enhances Magento 2’s capabilities, making it a top contender in the e-commerce platform market. Its comprehensive command list, coupled with the ability to create custom commands, provides a level of control and efficiency that is crucial in the fast-paced, ever-evolving world of e-commerce. Whether you’re a developer, store administrator, or business owner, mastering Magento 2 CLI commands and understanding how to create custom commands can significantly impact your store’s performance and your overall experience with the platform. By leveraging the power of Magento 2 CLI, you can ensure that your e-commerce platform is not only running smoothly but is also optimized to meet your unique business requirements. Magento 2, with its robust CLI system, proves to be an adaptable, powerful, and reliable solution for any e-commerce business.


